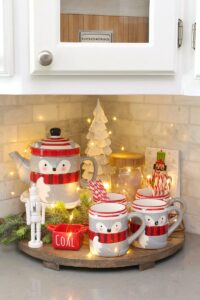
Learn how to style a wooden tray for Christmas with these simple tips and tricks. Customize your own tray to fit any style or color scheme.
One of my favorite things to do with seasonal decor is to put together cute vignettes. This corner tray in our kitchen is always lots of fun to decorate and typically one of the first things I style each season. Today, I thought that I would share some of my Christmas tray designs from over the years and give you a few tips for styling your own wooden tray.
How to Decorate a Wooden Tray
Wooden trays are a wonderful way to add a seasonal touch to your home. Using a tray as a base for your holiday decor allows you to keep everything corralled together and creates a less cluttered look. For smaller spaces, look to combine decorative elements with more functional items to create a pretty and useful tray.
Pick your tray.
Obviously, the first thing you’ll need is a tray to style! I like round or oval trays for fitting into corners or as a centerpiece on a kitchen island. A rectangular tray would work best if you’ll be placing it along the back of a kitchen counter. Be sure to take the size of the tray into consideration. You want to make sure that it’s proportional to the space you will be displaying it in and will be able to fit the items you want to display.
I purchased my wood tray a number of years ago from Decor Steals, but you can find some fabulous, inexpensive trays at HomeSense (or HomeGoods in the States). Amazon has lots of great options as well.
Choose a color scheme or theme.
Choosing a color scheme or theme (or both!) helps to give you direction for picking what pieces you want to display on the tray. This creates a cohesive look and really helps to draw the eye. This green and white tree themed tray from a couple of years ago. was a favorite of mine.
You can also use a tray to pull together items for a common function such as a hot chocolate bar or this Christmas milk and cookie bar.
Pick your items.
I usually start with one larger item that I want to use on the tray and then build around that. Cookie jars are a frequent item that I like to use. Not only do they work for cookies, but they can also be used to store any other items that you want to keep handy but out of sight. For example, I have stored seasonal cookie cutters, kitchen linens, other food items, etc. This Nutcracker cookie jar ended up being the inspiration for our whole Nutcracker kitchen decor last year.
Vary the height and depth.
When styling a tray, look to group items together, varying the heights and depth of the pieces to create more visual interest. If you have multiple items that are all the same size, add a cake stand or riser to create more height. To add height in the back, I often use a wood towel ladder. This one is from Sugar N Milk Co. but they have them on Etsy and Amazon too. It’s easy to find inexpensive towels in a coordinating color or theme and it adds a nice pop of color.
Add filler.
Once you have added the major components to your tray, add smaller items to fill in any gaps. I like to use smaller bits of greenery to fill in blank spaces or add smaller decorative pieces that coordinate. This really helps to pull it all together! If you still need a little more color or texture, roll up kitchen towels or find some coordinating napkins.
I hope you find that helpful and are inspired to put together your own seasonal tray! Let me know if you have any questions.
More Christmas Decor Ideas
For more Christmas decor ideas, check out these posts…
Free Nutcracker Christmas Printables
Green and White Living Room Christmas Decor
Amber Glass Christmas Centerpiece
The post How to Style a Wooden Tray appeared first on Clean and Scentsible.


